Tuesday, November 24, 2009

CraftWestport
Here are a few paintings I exhibited last weekend at CraftWestport.


"Hiking Hard"

"On the Run"

"Rounding the Mark #2"

And of course I showed my portraits as well. All of my paintings were original oils on paper or canvas.


"Jessamyn 18 Months"

"Ty 8 Years"


Jody


http://www.astudiobythesea.etsy.com/


http://www.jodylee.org/

Thursday, July 9, 2009

Handmade Weddings


Romantic Wedding Favors


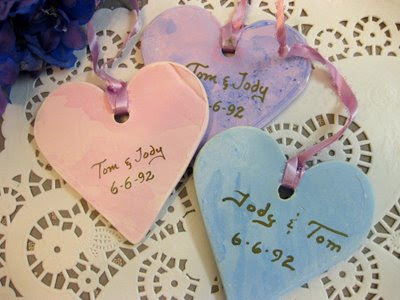
Seventeen years ago my husband and I had, apart from the keg of beer and some catered Chinese food, a completely Handmade Wedding. We had very little money but plenty of friends and relatives ready to help us out, and since I lived at the General Theological Seminary in Chelsea, a completely gorgeous spot to get married in. So I gave myself a year to complete all the tasks, which included designing and sewing the dresses for myself and the bridesmaids, making the cake, the flowers, the invites, the decorations and of course, the wedding favors.
I first looked for a nearby ceramics studio, and inquired to see if they would fire a box load of flat hearts for me, and what sort of clay I needed to order. I am not in the ceramic arts, apart from taking a few high school classes, but I know that different studios use different kinds of clay and fire them at different temperatures. You don't want to get porcelain clay if the people with the kiln never fire anything that high.

I then ordered a 50lb. bag of white clay and proceeded to roll out the clay just like you would for cookies, only I had two wooden strips about 3/8" high on either side of the clay so the rolling pin would rest on them and all the hearts would be the same thickness. I then used a heart shaped cookie cutter to cut out the hearts. I poked out a hole from front to back with a pencil, and used a small damp sponge to clean up the edges on the back, and any imperfections left by my fingernails. Clay shrinks in the drying and firing so take that into account. I let them dry on newspaper for a few days, and then took them to the ceramics studio to be fired.

When I got them back I had no intention of dealing with glazes and a second firing, for as I said before, I had more time than money. Instead I dipped them in a very, very, watery acrylic bath. I mixed up three colors with my acrylic paints: white, magenta, and a little red for the warm pink, phthalocyanine blue and white for the sky blue, and ultramarine blue, magenta and white for the lavender. I then slowly mixed in more and more water so that each was more like colored water than paint. Using my fingers, I dipped each heart in one of colored waters and then put it on wax paper to dry, though I think I would use tweezers or tongs to do it today. It makes a very pleasant soft watercolor effect and the 300 hearts were done in no time.

I painted the flowers on the hearts in relatively simple shapes, using just these two kinds of brushes, a synthetic #1 round and a #8 or #10 round. The flowers and color scheme matched the wedding party and the flowers I had painted on the bridesmaid dresses. It is important, when using acrylics in this manner, not to use the colors straight out of the tubes or too thickly. My paint is always in a consistency somewhere between olive oil and water. If you are not handy with brushes, practice on paper first, and work with the pointy end of the bristle to make sharp points to the leaves or petals. The leaves may look like one brush stroke, but in fact require two to three strokes to make those shapes.


One friend painstakingly wrote our names and the date of our wedding on the back while another tied on the ribbons, and our nieces handed out the favors to our guests. Many of my friends and relatives still have them!


I think today there are many different air-drying clays you could use instead of actual pottery clay. They are available at art stores and online suppliers and would require a little research. There is certainly a greater variety of cookie cutters! You are sure to find a shape with special meaning for the special couple. For an experienced crafter this is a fun way to handmake a wedding favor that your friends will keep and remember.


Jody Lee


http://www.astudiobythesea.etsy.com/

Monday, June 15, 2009

Crafts & Craft Selling for Kids


If you are a crafter parent it won’t be long before one of your children asks, “Can I make things to sell too?” Then your quandary is, what can a child make that actually looks good enough to go in your shop or display? Fine craftsmanship is not exactly something your average ten year old is capable of. My daughter tried making pins in felt, which were adorable but were too much work for the price point they would sell at. She tried crochet, but couldn’t master anything beyond a chain. Finally what worked was “Jessamyn’s Button Hairbands,” which consisted of large cloth covered buttons (re-using fabrics from thrift shops) with elastics tied to the shanks on the back. Moreover, making them was a process she could do virtually by herself. I bought the supplies, designed her card, and she pays me back 50 cents for every button she sells. And she does very well, selling them at fairs at a low price point, yet earning enough to be the envy of all her friends.


So here is another idea for kids wanting to earn their keep, or like mine, to sustain their addiction to Pokemon cards.


Recycled Bag Tags & Bookmarks


Supplies & Tools:


Old Magazines

Scissors

Glue Stick

Paper Cutter

Mylar or Acetate sheets or any kind of flat, clear plastic

Colored paper (if for business it should be non-fading)

Laminating Sheets (if for business get the heaviest weight)

Hole Punch

Plastic Lanyard or other string or yarn

Let the kids go through the old magazines cutting out all the headlines that are over 3/8” tall. Remember the letters must fit comfortably on a 1.25” strip of paper. If this will be for a “business” they can cut out all the letters individually and put them in marked envelopes for each letter, number, and one for symbols. Some of these headlines were funny enough to use all by themselves, come to think of it.

Using the paper cutter, cut 1.25” wide strips of colored paper (I had old scrapbooking paper the kids had been cutting up inefficiently for the last 6 years) or magazine pages with great color or texture for the background. If you don’t have a paper cutter you can use a scissor but the rolling cutter is more efficient and far safer than things like x-acto blades.


Now they can choose the letters they will use. Names are good, as are cool phrases and sports. Run the glue stick along the length of the strip of colored paper. Arrange the letters and press into the glue. Leave room on one end for a hole if a lanyard will be attached.

Cut a larger strip of acetate, and glue the back of the colored paper onto it, so the tag will have some firmness. We actually used for strips the heavy plastic from a box of Pokemon cards, so we felt very virtuous and green. Cut a strip of laminating paper and use it to carefully seal the front of the tag to the acetate, leaving at least 3/16” extra space all around the colored paper. This is undoubtedly the trickiest part of the whole process and your kids will need some practice to master it. You need to fold back just a corner of the laminating paper and then position it atop the tag. Then you slowly peel off the backing while smoothing it down at the same time, starting from that first corner. With the paper cutter trim the sealed edges. Punch a hole (you will need a good quality hole puncher, like McGill or Fiskars, available at craft stores) in the tag and add a lanyard or string.


The fun, hip, professional looking results can be used as a bag tag, a book mark, a backpack decoration, a necklace, a party favor, a seating tag, and I've even been thinking, earrings, if you want to work really, really small. The process can be used for children’s parties, school fair fundraisers, for starting your child’s own Etsy Shop, and of course, a few hasty Father’s Day gifts.


Sunday, June 14, 2009

These Babies Need a Good Home (and Some Handmade Clothes)


I also found these three adorable headless baby mannequins at the Fortunoff sale. I have no use for them and bought them to SELL AT COST to any member of the New New Team (or someone they know) so they will find a new, loving, crafter home. They are way classy and cuddly and will make your display look like it stepped out of a high end children’s boutique.


The appendaged babies have a loop on the back for hanging and a pipe in a leg for standing (though one baby lost its loop when Child “J” decided to swing it around, new owner will just have to rig a new one.) They are $70.00 for all three. Contact me at jodylee@jodylee.org and ignore the non-delivery mail response, it’s wrong. I’m not going to haggle, or split them up, or jump through hoops to mail them to Nebraska. If someone wants them I’ll bring them to a street fair or team meeting, and if no one does, I will put them up on Etsy for a profit or use them to display my daughter’s cute baby clothes – yes, I’m a hoarder of useless, sentimental objects, so act now before my hoarding instincts get the better of me.

The Arrival of Doris


The loss of our local Fortunoff is my personal gain. I had never shopped there before, but bought a mannequin from their going out of business sale. We have named her Doris and she will model my earrings and necklaces for my Etsy shop. Unlike my first model (my daughter) Doris looks like a grown-up, and does not complain or sulk no matter how long I make her pose. She does not even ask to be paid or fed! Of course, being a plastic model, I would probably only need to give her a lettuce leaf from the toy food box and she would be happy.


My brother-in-law works for the company that owns the property the Fortunoff was located in and I’m going to suggest they bring in an IKEA store. Westchester could really use one, and I would actually go into it and buy things, unlike the deceased Fortunoff.

Our First Street Fair


It was very nearly a disaster. Grandma, Jessamyn, and I set out at the crack of dawn for the Fabulous Fifth Avenue Street Fair on a blustery May morning. I was going to show my artwork and my beads, and Jessamyn was going to show her button hairbands. It was our first time selling from a tent on the street and we were not prepared for high winds and possible rain. The tent tried to blow away, the panels fell over, and the display followed suit, beads flying, carousels breaking. At one point Grandma and Child were in tears and asking to go home. In my best “Calm Mommy” tones I said nobody was hurt and we would keep trying. The artwork never went up and stayed happily under an extra tarp I had brought. We developed our seller’s lines; “These buttons are made by Jessamyn…These are glass beads I make by hand…” and we sold a lot of product! We met two other Jessamyns, a young mother from Britain and a pretty college student. We also spent HOURS untangling the cupcake necklaces, "cutting" through the last Gordian knots only minutes before it was time to take down the tent. Whew! I'm not a coffee drinker but I downed a McCafe Mocha for the drive home.

Wednesday, May 13, 2009

This Little Piggy went to Market -At the Spring Handmade Cavalcade!

My Sunday morning of volunteering for the SHC at the Bell House in Brooklyn, after a run to buy toilet paper and an hour of handing out fliers, turned into a shopping spree! Since I live in Westchester, it was my first time to see some the shops of the New New in person. To invoke the Martha, also a Westchester denizen, there were so many "Good Things" that it was hard to stop openning up the wallet.
The first item I just could not resist was this joyous little pillow from Cakehouse, that matched my sky blue & floral livingroom perfectly.

The end of the school year approaches, so I found these two bright and charming notebooks from Journalistic Tendencies, handmade with recycled papers, and just the right gift for my daughter's teacher.


Next, I restocked my supply of birthday cards from Waisze - all cupcakes, to remind my nearest and dearest of my own little cupcake beads.


Since it was Mother's Day I had to pick up this sterling silver cat mask pendant from Caja Jewelry for my hip, pootie loving Mom. Such a modern little gem! I'd hearted it on Etsy and found I could not resist in person.


Lastly, I was not going out that door without 2 boxes of tiny cupcakes from Nine Cakes. After a chinese dinner out, they made for a charming dessert. So lovely, with firm, pure tasting cake and the most silky smooth buttercream we've had in ages. Bravo, Nine Cakes!


Home again, Home again, Jiggety Jig!


Monday, May 11, 2009

Look at Me! Look at Me!


I feel like Arthur's little sister running around saying "Look at ME! Look at ME!" with this first post. In other words, an embarrassment to others. Just dipping my toes in the bloggy waters, but heres some pix of my product - whoops, what an unromantic way of putting that - my work.